April 1, 2024
How to Onboard Your Existing Users
Seamlessly onboard your existing users with OnSched's white-label scheduling solution. Learn how to use OnSched’s setup API endpoints to configure resources like people, places, and assets, ensuring your users experience a smooth integration without knowing a third-party API powers their scheduling. From creating and updating resources to syncing with Google and Outlook calendars, OnSched provides all the tools you need to get your users up and running quickly. Explore our pre-built onboarding UI for an even easier integration. Start your free trial today and discover how OnSched can enhance your scheduling capabilities.
Strategies
4 Min Read

As you know, OnSched is a white-label solution that is easy to integrate on the backend. This is done in a way whereby the end-user will never know that the scheduling features of your app are being powered by a third-party API. The users' experience will be seamless. But how do you achieve this in practice? We will answer this question in this article.
How to onboard your users?
In the OnSched glossary, the term “resources” refers to any of:
people (such as sales representatives or pharmacists);
places (a room or space); or
assets (salon chair or desk) that will be booked are called resources.
In order to onboard your resources, you will need to send a specific data-set containing all of the resource’s preferences to an appropriate /setup API endpoint.
We have grouped all endpoints used for profile configuration and user onboarding into so-called /setup endpoints while all of the bookings/cancelations are handled by /consumer endpoints, which we discuss in another article. They are no different in terms of authentication but are separated into two groups for a better developer experience.
How do setup API endpoints work?
Setup API endpoints include such features as creating companies, business locations, setting up services, and onboarding resources. As an example, we will assume your company account is already configured and you just want to let your users input the information required for online scheduling to work. You will need to collect the data through a form and send it to /setup/v1/resources endpoint in a JSON format that follows a schema specific to that endpoint.
Each one of the API endpoints has its own schema. Schema is a structure template that specifies which data and in what format should be sent through the API. Here’s the JSON schema for the POST request to /setup/v1/resources, which creates resources. JSON was designed to be human-readable, so you can get an idea of what configuration data is being set up for the resource in the OnSched.
{
locationId: string //OnSched's internal business location ID
name: string //resource's name
email: string //resource's email
description: string //resource's description
groupId: string //resource group ID
timezoneId: string //resource's time zone
recurringAvailability: boolean //reccuring availabiltiy setting
serviceIds: [...] // list of resource's service IDs
address: AddressInputModel{...} //address
contact: ContactInputModel{...} //contant information (conference link)
availability: AvailabilityInputModel{...} //weekly availability
options: ResourceOptionsInputModel{...} //secondary settings
customFields: CustomFieldInputModel{...} //custom fields
}
There are extensive options, which are specific to each resource. You can find the full schema for /setup/v1/resources, including input models in our API reference.
How to update a resource’s settings?
Updating a resource’s account will require sending a PUT request structured in the same way as the previous POST requests to the same endpoint but with the resource ID attached in the end - /setup/v1/resources/{id}.
How to delete a resource?
Deleting a resource will require sending a DELETE request with the /setup/v1/resources/{id} endpoint, including the resource's ID in it.
Google and Outlook Calendar Synchronization
After a resource has been created you can send a GET request to OnSched to get a Google or Outlook authorization link. The endpoint will depend on the calendar provider of the user’s choice.
Google: GET /setup/v1/resources/{id}/calendar/auth/google/{googleEmailAddress}
Outlook: GET /setup/v1/resources/{id}/calendar/auth/outlook/{outlookEmailAddress}
OnSched will respond with a calendar authentication URL which can be passed to the user for synchronization.
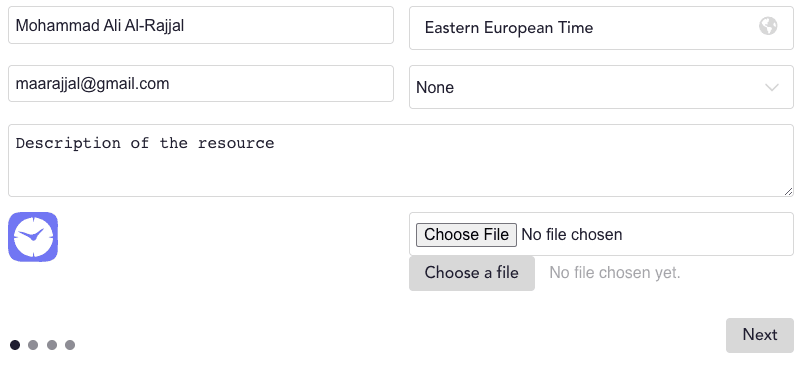
Pre-built onboarding UI
OnSched.js has an element for resource onboarding. It’s fully customizable and includes all settings from start. Integration can be as easy as including the script in your codebase with your unique ID. You can find more information
How to get access to the OnSched API?
We love to guide our customers through the platform the first time they sign up. So: in order to gain free trial access to the OnSched API, book an intro call with our specialist. We promise it’s pressure-free 😉
Thoughtfully test the API for all of your user flows.
Request production server API keys when ready to go live.
If you have any questions about the OnSched API, we encourage you to book an intro call even if it’s not on your immediate roadmap - let's plan for the future!